For me, the holy grail of home automation isn’t just being able to control lights with your smartphone. Connecting your lights to the internet opens up a ton of possibilities. Your smartphone is just one way to control them. The holy grail of home automation is removing the need to even control your devices at all.
When I watch a movie, I want my lights set a certain way. Seems simple enough. I watch everything on my Apple TV, so surely there should be a way to detect that and send the message along to HomeKit. In the past I’ve used a plugin for Plex that handled this quite well. The only downsides were that it was painstakingly tedious to program in the lighting settings, and it only worked in Plex. I figured the Apple TV must transmit its global play/pause state somehow, seeing as the Apple TV iOS app displays it.
Enter the Media Remote Protocol
So I began researching how the Apple TV communicates. Turns out it does so a few ways. There was DACP, which I have some experience with and didn’t want to resort to, and MRP. If you Google “MRP” you won’t find much. It stands for Media Remote Protocol and it’s a new protocol released with the 4th-generation Apple TV. Luckily for me, Jean Regisser had already done quite a bit of reverse engineering on the protocol. He determined that it worked by sending length prefixed protocol buffers over a TCP connection. Messages were encrypted using the Secure Remote Password protocol, similar to that of HomeKit. He also created many of the necessary protobuf files. Pierre Ståhl had also begun to implement the protocol in Python (I wanted to build a Node implementation for use with Homebridge). While incomplete, it was still incredibly helpful in getting this to work.
Quick break. We’re about to dive into how the MRP protocol works. This is meant to be more of a high-level overview. For something more technical, you can checkout Jean’s mediaremotetv-protocol repository or the node-appletv code itself. I’ll provide code snippets and links to the node-appletv code wherever relevant. Protobuf message names will link to their definitions.
The way the protocol works is fairly simple, albeit with a few quirks. Encoded protocol buffers are sent over a TCP connection (the IP address and port can be determined by searching Bonjour for the _mediaremote._tcp service). The encoded protobuf data is prefixed with one or two bytes, encoded as a protobuf varint, indicating the length of the message to follow. All messages sent are of type ProtocolMessage which is a common envelope that can contain several other message types. You can set an identifier on the ProtocolMessage for types that will send a response.
Connecting to an Apple TV
The connection process begins with an introduction. You (the client), start by sending a DeviceInfoMessage. The Apple TV (the server), will then respond with a DeviceInfoMessage identifying itself. Now the fun begins. The next step depends on if you’ve paired before. If you have, take your saved credentials and head to the verification step. If not, it’s time to pair.
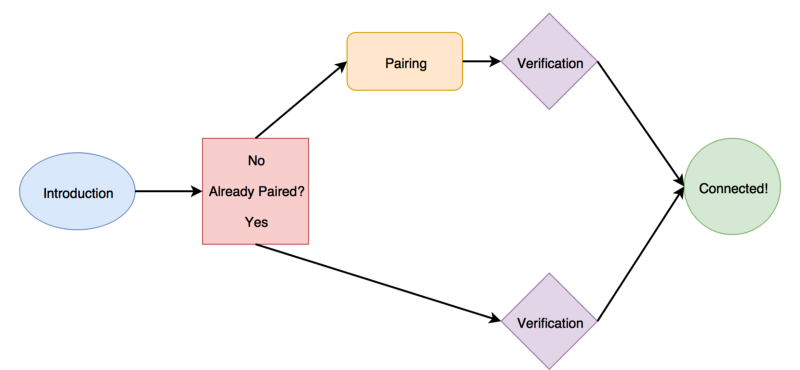 Media Remote Protocol Connection Flow
Both the pairing and verification steps are nearly identical to the HomeKit client protocol except for the fact that it’s over a raw TCP connection instead of HTTP. The pairing process works by exchanging CryptoPairingMessages with the server. CryptoPairingMessage takes a parameter, pairingData, which is Type-length-value (TLV) encoded data. A caveat of this message type is that while we do expect a response to our messages, it does not support the identifier field. You can send it with one, but the response won’t have it. Instead each CryptoPairingMessage's pairingData contains a TLV encoded “sequence” number. This allows us to determine where we are in the pairing process. For more specifics on the pairing process, check it out in the node-appletv code.
 Pairing an Apple TV with node-appletv
The pairing process yields us a public key and a signing key. These, along with some other values, should be saved so that the user doesn’t have to re-pair next time. These keys will be used during the verification process to generate our encryption keys. This is something you’ll need to do on every connection. After the verification process is completed, all messages from there on must be encrypted, as well as all messages sent will be encrypted. The verification process is fairly similar to the pairing process. See how it’s done in node-appletv here.
We’re Connected. Now What?
Now that we’re connected, the real fun begins. Well, not quite yet. There are still some things we need to do. The Apple TV expects the client to send a SetConnectionStateMessage once verification is complete. This is the first encrypted message that should be sent. After that we’ll want to send a ClientUpdatesConfigMessage to tell the Apple TV which updates we’d like to subscribe to. In this case, we’re interested in nowPlayingUpdates.
Okay, now we’re connected for real. Now we can do all sorts of fun things. We can send key presses (menu, play, pause, etc.) using a SendHIDEventMessage, we can register as a voice input device to send speech to Siri, and finally, we can receive now playing updates in the form of a SetStateMessage.
 Monitoring the Now Playing State of an Apple TV with node-appletv
The SetStateMessage is essentially a common container for a few things. It can house NowPlayingInfo, SupportedCommands, PlaybackQueue, and probably more.
A Minor Setback
After building node-appletv and it’s companion command line interface, I was able to start poking around to see what information the Apple TV is actually going to push to me, and when. node-appletv's appletv command makes this really easy. We want to monitor state changes. First we’ll need to install node-appletv and pair our AppleTV.
$ npm install -g node-appletv $ appletv pair
This kicks off the pairing process. You’ll need to input the 4-digit pin from your Apple TV and then you’ll see your credentials string. With this, we can now monitor state changes.
$ appletv --credentials <credentials-from-pairing> state
This will start logging state changes to the console as the Apple TV sends them. I quickly realized that this was not going to be a reliable method for determining the playback state. Messages were often delayed several seconds after the state changed, sometimes not at all. And the state would constantly get out of sync, saying that the Apple TV was playing when it was paused and paused when it was playing.
Back to the Drawing Board
I observed the play/pause button in the Apple TV iOS app while I continually tapped play/pause on my physical Apple TV remote. The button matched the state of the Apple TV perfectly. So I was either doing something wrong in my MRP implementation, or the Apple TV wasn’t getting that information over MRP at all.
I figured it’d be easier to rule out the latter possibility first. I connected my iPhone to my computer, created a remote virtual network interface with my iPhone and fired up Wireshark. I filtered to only show traffic going between my iPhone and Apple TV and saw that all traffic was going to the MRP port. So that rules that out.
My next plan of action was to more closely examine the MRP traffic. So I dug out my old iPhone 5, updated it to iOS 10, and jailbroke it. I decrypted the Apple TV app and patched it to log out all sent and received protobuf messages. The results were quite puzzling.
First of all, my log file quickly ballooned in size. Upon a quick examination, I saw that the app was continually sending out PlaybackQueueRequestMessages, at least once or twice a second. I checked out the response to this message, and there wasn’t much there in terms of the playback state. But still, it must be relevant if that was the only difference.
Since the AppleTV object in node-appletv inherits from EventEmitter, I can easily determine when someone is listening for the state. So I modified node-appletv to send out aPlaybackQueueRequestMessage every few seconds while someone was listening to the state. And much to my surprise, it worked! It wasn’t flawless. State changes were still sometimes delayed by a second or two, but honestly, that was good enough for my use case.
Building homebridge-theater-mode
Now we’ve learned enough to start actually building our homebridge plugin. Luckily, node-appletv will do most of the work for us. To observe the now playing state of the Apple TV, once we’re connected, all we have to do is this:
I realized that there would be cases where I didn’t want my lights to change while I was watching my Apple TV (during the day, etc.). So I solved this by having the plugin add a virtual switch to HomeKit. This switch essentially allows you to toggle the plugin on and off right from the Home app.
I also wanted configuration to be very easy, almost native feeling. Luckily for me, Apple recently added a stateless programmable switch type to HomeKit. This is meant for physical push buttons to trigger HomeKit actions. I made use of this and linked each button to a playback state. You can configure actions for play, pause, and stop. All the homebridge plugin does is basically “tap” these buttons in response to playback state changes on the Apple TV.
The end result is great. I can be sitting on the couch watching a movie with all the lights off. If I want a snack, I tap pause and the lights turn on dimmed. When I’m done, the lights turn all the way up. I no longer have to yell at Siri or Alexa over the sound of the movie to get the lights to turn off. My apartment just knows I want the lights off. So it does it for me. That’s the holy grail of home automation.
homebridge-theater-mode is available on Github, as is node-appletv.